The start of your degree can be both exhilarating and daunting. With so much information to learn, you’ll inevitably need to read textbooks in your degree to consolidate your knowledge. The Library is the perfect place for that, but how do you use it effectively? There’s no need to worry, read on to find out more…
With the Welcome week coming to a close, you’ve probably had a fantastic time getting to know your peers and having a few (or maybe more!) cheeky pints at the Dirty Duck. However, you may be wondering how to use the Library now that uni is starting?
Well, my dear reader, you’re in luck; the Library hosts the Get started library tour which will help you how to make the most the Library! Let me break down what the tour will consist of:
The Welcome Point and barriers
The first part of the tour will show you how to gain access to the Library – simply scan your student card on the reader and the barriers will open! If you’re the forgetful type, there is no need to worry. You can use the temporary library pass machine to print out a pass that will be valid until 23:59 the same day of issue – of course, try not to make a habit of this. If you need any help with access, please speak to the staff at the Welcome Point desk – they’re happy to help and are available 24/7.
The Helpdesk
As you continue to walk, you’ll notice some friendly faces working at the Help desk on your left. These folks are there to assist you with any library-related enquiries you may have and are available from 08:30 – 21:30.
The Library Search system
If you walk forwards you should see a row of computers already logged on. These computers use the Library Search system and this is how you can find the resources you want! The Library has a bunch of different media you can use including textbooks, e-books, journals (print and online), DVDs and archives! Print textbooks have three borrowing types: Standard (2 weeks), short loan (typically 3 days) and reference only (to be used in the Library only). Check out the Library webpages for more information on borrowing entitlement.
Short-loan books
After making a left turn, you will find a “mini-library” full of various books. These are special as they are highly requested books, so they are only issued until 11 am the following weekday. You can also find any books that you requested a hold on as well. You should receive an email to your Warwick email address once your hold is ready.
The classmark system
Walking towards one of the books and taking one out, you’ll notice a code on the spine of the book. This code is known as a classmark and it’s used to identify a book and where it can be found in the Library. You can use the maps by the lifts to identify which floor the book is located on. Then look to the signage on the bookshelves, and go through the books in numerical order to find the book you need! Don’t worry if you get confused – the Helpdesk will be more than happy to help you!
Borrowing a book
Borrowing a book is really easy at the Library! You’ll see there are self-issue machines on the first floor, near the Helpdesk – they look like tall computer desks with a “v-shaped” gap on the tabletop. All you need to do place your student card on the reader, take the book you want to borrow, place its spine on inside of the “V-like gap” and wait until you hear a “clunk!” sound as this means the book has been taken out successfully! You can also print a receipt if you want to keep track of your books that you’ve taken out.
Assistive Technology Area
Walking out of the short-loan area, you’ll see some computers to the left-hand side with large dividing screens. This area is very special – it has software that can help make studying easier such as text-to-speech software and mind-mapping just to name a couple. It is a fantastic place to work, as it has adjustable chairs/tables and it is very spacious too! Bear in mind that while anyone can use it, it is targeted to those registered with disability services.
Printing
Walking from the Assistive Technology Area, you’ll notice many printers abound! Here you can print in black/white or colour, photocopy and scan documents but you can also staple your printouts as well! Unfortunately, printing and copying do cost money, but you can scan documents for free. Don’t worry if all the printers are busy, there are printers on the upper floors as well.
Returning your books
Completing our tour is the Returns Machine. Place the book on the conveyor belt with the book spine and the classmark underneath the scanner. The book will then be magically taken into the book sorting area. Don’t leave your phone on the belt as that might be whisked away too. Make sure to allow time for the book to be completely taken before placing another one. Once you’ve finished returning your books, you can print a receipt for your records. The book has now been taken out of your library account.
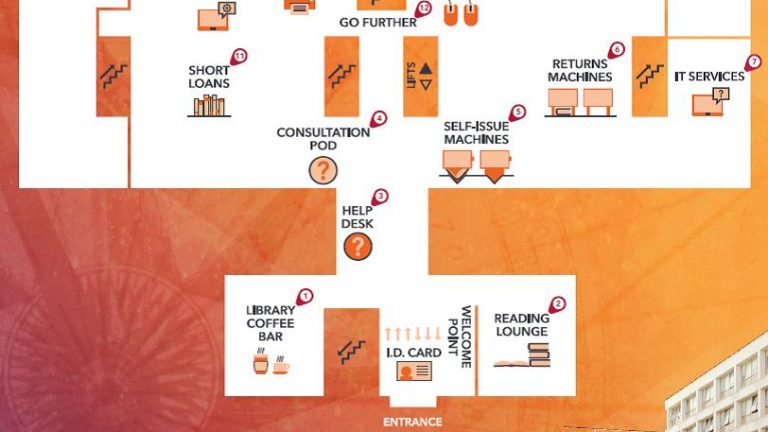
That about sums up the basics of the Library! If you want to see a plan of the first floor, the Library self-guided tour map is really useful – take a look! If you want more information about getting started with the Library, you can find out more information here. As mentioned before, the staff at the helpdesk are happy to help you if you get stuck. It can be daunting using the Library for the first time but after some practice, you’ll be a pro in no time! Make sure to book some tours for a more interactive guide as well and don’t forget to check out study spaces at Warwick!
That’s all from me today and be sure to share this post with others too!